Pioreactor software setup
Your setup: — change
The plugins go onto the card while you flash it, so the unit boots ready. Text as in AEP-Plugin/README.md.
-
Two changes to make while following Pioreactor’s software set-up guide, which comes next:
-
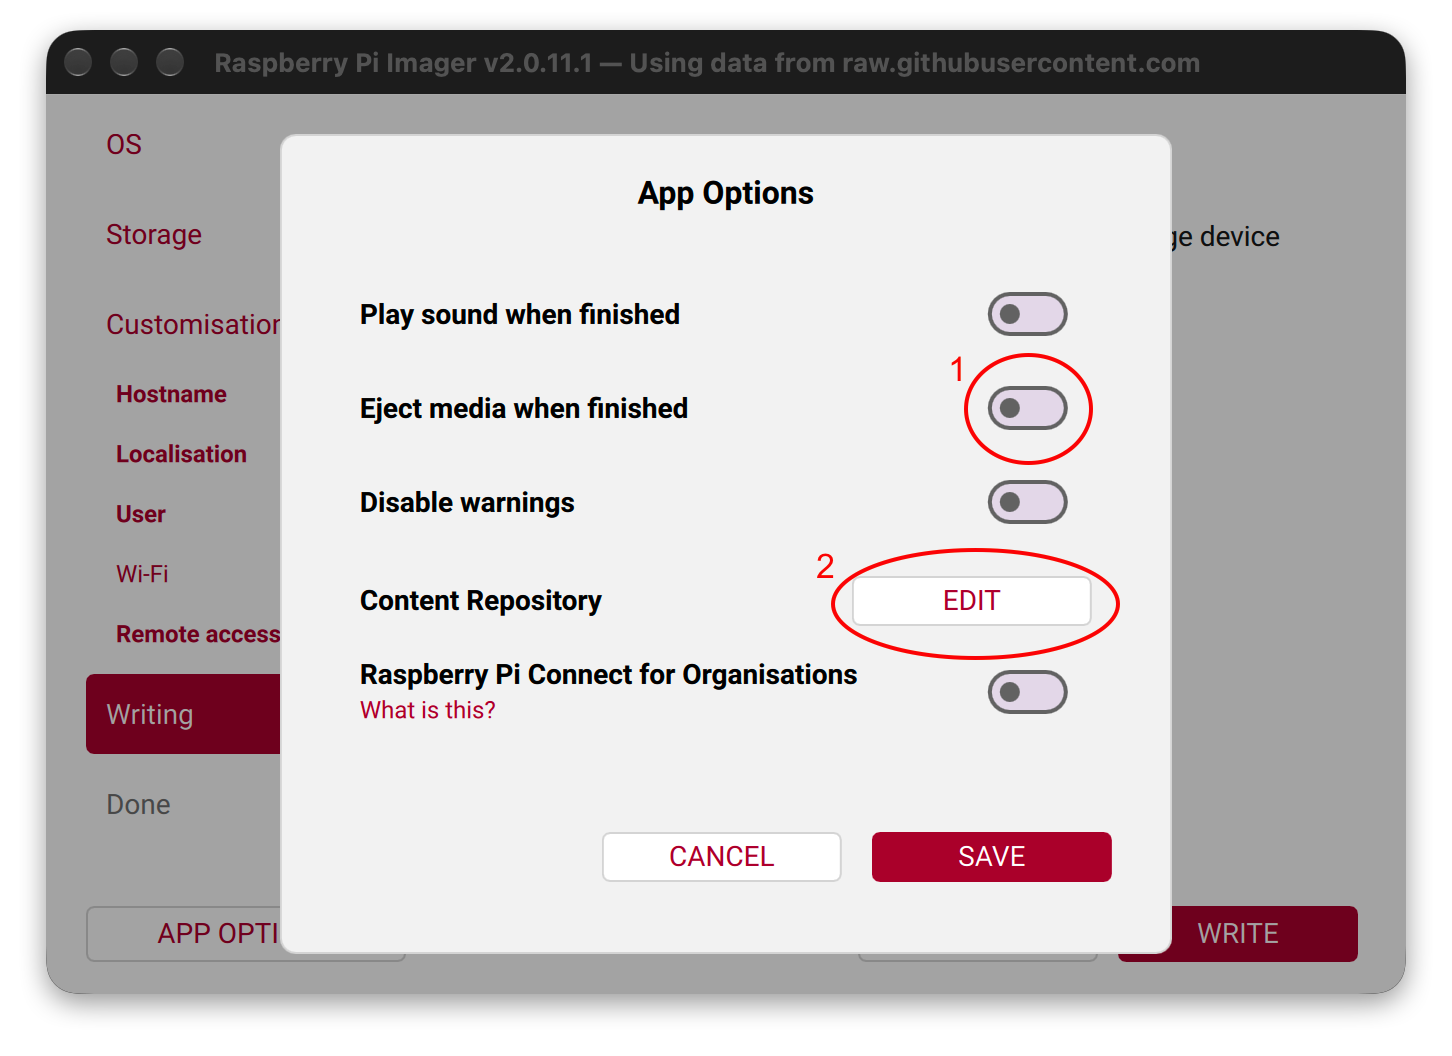
At its step 3, in App Options, switch off Eject media when finished (1) before you set the Content Repository (2), so the card stays mounted after the write.
-
At its step 15, for your The Pioreactor that hosts the web interface and config.ini for a cluster. A single stand-alone unit is its own leader (Leader + Worker)., leave the Wi-Fi page blank if you can’t add devices to your lab’s Wi-Fi then reach them through it (typical at universities); the leader Pioreactor then makes its own network.
-
A Pioreactor that runs experiments under a leader. It has no web interface of its own and takes its config.ini from the leader.-only units: follow the same steps with a Worker image. Flash each worker with the step 15 Wi-Fi page set to network
pioreactor, passwordraspberry, and at step 3 below do not drag thelocal_access_pointfile across. The plugin installs when you add the unit from the leader’s Inventory page. The leader makes its own Wi-Fi network, pioreactor (password raspberry). Use it where you cannot add devices to the site Wi-Fi. cluster: boot the leader first.
With those in mind, follow Pioreactor’s software set-up guide up to Write, and come back here while the card writes.
-
-
Download and unzip the AEP card bundle.
-
When the write finishes, drag the
pioreactorfolder from the bundle onto thebootfsdrive. If you left the Wi-Fi page blank (for the leader Pioreactor to make its own network), also drag across thelocal_access_pointfile, after changingGBin it to your country code*. DO NOT drag it across for workers, or if you set your Pioreactors up to join a Wi-Fi network. If the card was ejected anyway, remove and reinsert it. -
Eject the card. One change to the rest of Pioreactor’s guide: for a unit that makes its own Wi-Fi, join the network
pioreactor(passwordraspberry) and openhttp://pioreactor.local. Then continue the guide from its step 18; the model dialog at its step 21 does not appear, because the bundle has set the model. electroPioreactor is under Activities on the unit’s Manage page, and the The Pioreactor software plugin that runs the Precision Temperature Upgrade Kit's sensor. The AEP card bundle installs it; the MEP bundle has none. is installed.* If your country code is not GB, open
local_access_pointin TextEdit/Notepad and replaceGBwith the ISO two-letter code (CA, IE, DE, AU, NZ, GL, US, etc.; see https://en.wikipedia.org/wiki/ISO_3166-1_alpha-2) and save; the file should contain just those two letters. Do nothing if you live in the United Kingdom of Great Britain and Northern Ireland (GB).
If it is missing, put the card back in your computer: pioreactor/plugins/failed/ on bootfs holds the A Python package file (.whl). The card bundle carries the plugins as wheels; one that fails to install lands in pioreactor/plugins/failed/ on bootfs, with a log. and a log of what went wrong.
Without the card bundle (older Pioreactor OS)
Pioreactor OS needs boot-partition plugin support for the card route. On an older release: flash and boot as Pioreactor’s guide says, run pio update (26.5.0 is the minimum), set the unit’s model to the XR variant in Inventory, add the XR photodiode channel values to config.ini from the end of the XR assembly guide, and install the plugins over Secure Shell: a command line on the Pioreactor from your computer's terminal, for example ssh [email protected]. as in AEP-Plugin/README.md.
Notes
- On the recording the unit was named
ed06: location (Edinburgh) plus unit number. - Until the model is set to XR in Inventory, Optical density: how cloudy the culture is, read from scattered light. It tracks cell growth. readings are interpreted against the wrong channel map.
Parts
- 1×microSD cardpart
- 1×Precision Temperature Upgrade Kitearlier stepOnly with temperature kit
Tools
- 1×Computer with microSD card readertool
Check your work
Fallback route only (no A zip from the electroPioreactor releases page. Copied onto the card's bootfs drive, it installs the plugins and sets the model on first boot.): which Pioreactor software version is the unit running?
Run
pio update.Flash the latest image instead, or give the unit internet over a cable: see Internet over an ethernet cable in Check the plugin.
Show the answer
Answer: 26.5.0 or later
- If you see Older than 26.5.0: Run
pio update. - If you see Older, and
pio updatefails offline: Flash the latest image instead, or give the unit internet over a cable: see Internet over an ethernet cable in Check the plugin.
- If you see Older than 26.5.0: Run
In Inventory, which model does this unit show?
Set it to the XR variant in Inventory. Until then, Optical density: how cloudy the culture is, read from scattered light. It tracks cell growth. readings are interpreted against the wrong channel map.
Set it to the 40 ml XR variant in Inventory. Until then, OD readings are interpreted against the wrong hardware.
Show the answer
Answer: Pioreactor 40 ml, XR variant
- If you see Pioreactor 40 ml, standard v1.5: Set it to the XR variant in Inventory. Until then, Optical density: how cloudy the culture is, read from scattered light. It tracks cell growth. readings are interpreted against the wrong channel map.
- If you see Pioreactor 20 ml, v1.1: Set it to the 40 ml XR variant in Inventory. Until then, OD readings are interpreted against the wrong hardware.
Fallback route only (no A zip from the electroPioreactor releases page. Copied onto the card's bootfs drive, it installs the plugins and sets the model on first boot.): which XR photodiode channel values does config.ini hold?
Add the rest, as listed at the end of the XR assembly guide.
Add them as listed at the end of the XR assembly guide.
Show the answer
Answer: All those listed at the end of the XR assembly guide
- If you see Some of those listed at the end of the XR assembly guide: Add the rest, as listed at the end of the XR assembly guide.
- If you see None: only the stock v1.5 photodiode values: Add them as listed at the end of the XR assembly guide.
What does Plugins in the Pioreactor UI show for The Pioreactor software plugin that runs the Precision Temperature Upgrade Kit's sensor. The AEP card bundle installs it; the MEP bundle has none.?
Only with temperature kit
Give the unit internet over a cable (see Internet over an ethernet cable in Check the plugin), then install it.
Read the log in
pioreactor/plugins/failed/on the card'sbootfsdrive, then install it over Secure Shell: a command line on the Pioreactor from your computer's terminal, for example ssh [email protected]. as in AEP-Plugin/README.md.Show the answer
Answer: Listed as installed
- If you see Missing: the install needed internet: Give the unit internet over a cable (see Internet over an ethernet cable in Check the plugin), then install it.
- If you see Missing: the card's failed log names it: Read the log in
pioreactor/plugins/failed/on the card'sbootfsdrive, then install it over Secure Shell: a command line on the Pioreactor from your computer's terminal, for example ssh [email protected]. as in AEP-Plugin/README.md.
Step checked