Pioreactor software setup
The electroPioreactor plugin goes onto the card while you flash it, so the unit boots ready. Text as in AEP-Plugin/README.md.
-
Two changes to make while following Pioreactor’s software set-up guide, which comes next:
-
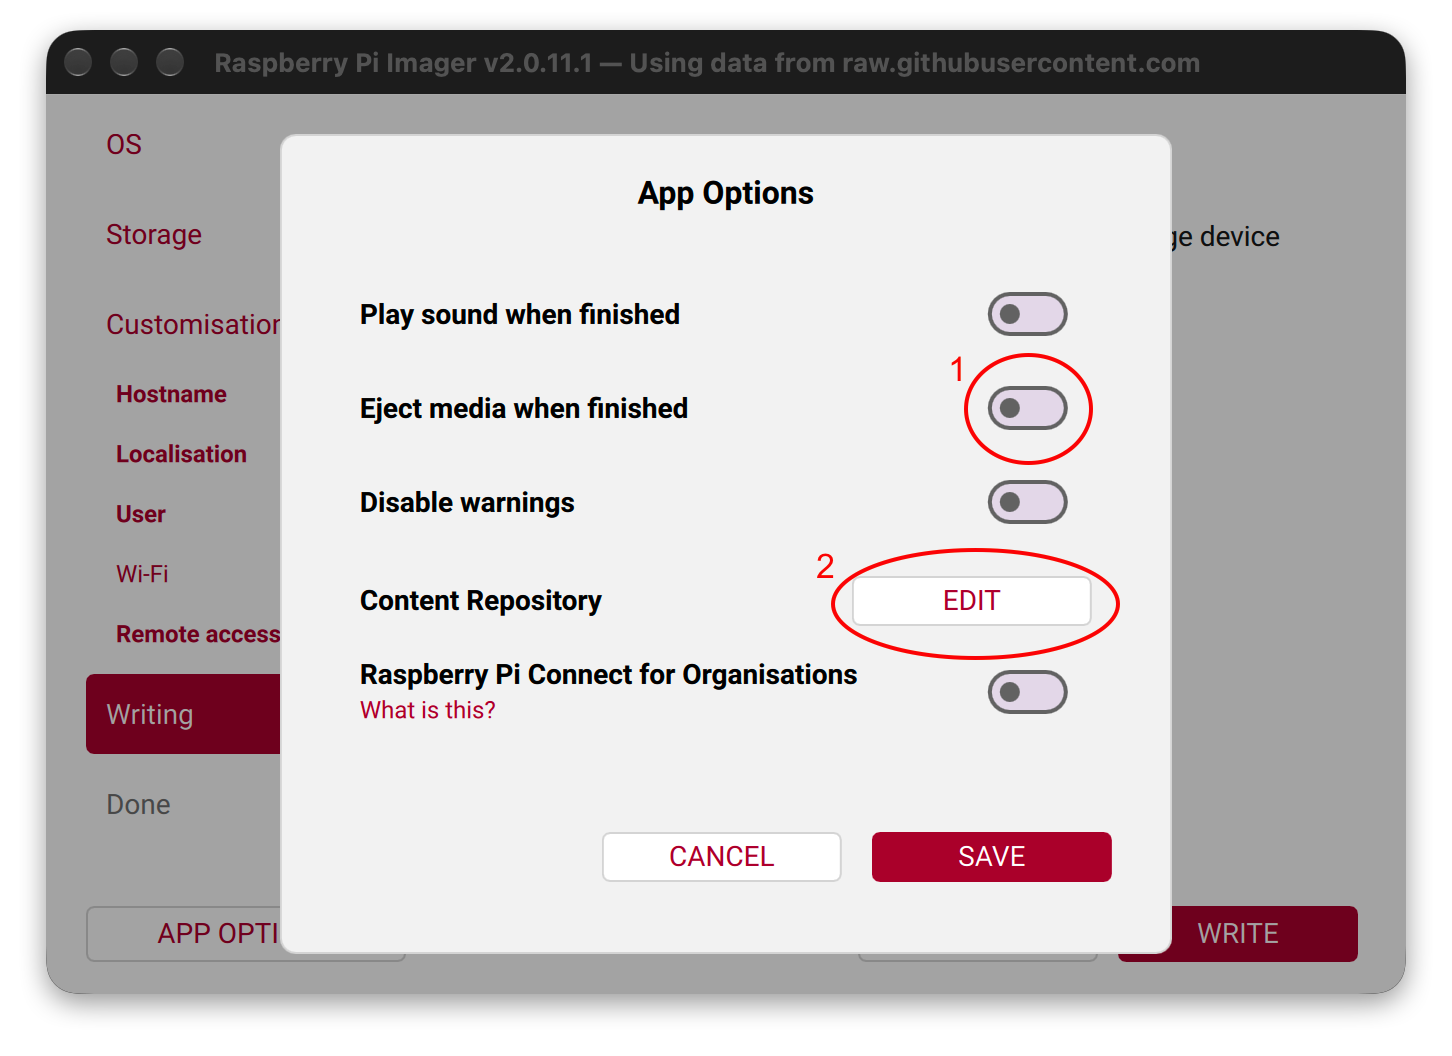
At its step 3, in App Options, switch off Eject media when finished (1) before you set the Content Repository (2), so the card stays mounted after the write.
-
At its step 15, for your The Pioreactor that hosts the web interface and config.ini for a cluster. A single stand-alone unit is its own leader (Leader + Worker)., leave the Wi-Fi page blank if you can’t add devices to your lab’s Wi-Fi then reach them through it (typical at universities); the leader Pioreactor then makes its own network.
-
A Pioreactor that runs experiments under a leader. It has no web interface of its own and takes its config.ini from the leader.-only units: follow the same steps with a Worker image. Flash each worker with the step 15 Wi-Fi page set to network
pioreactor, passwordraspberry, and at item 3 on this page do not drag thelocal_access_pointfile across. The plugin installs when you add the unit from the leader’s Inventory page. The leader makes its own Wi-Fi network, pioreactor (password raspberry). Use it where you cannot add devices to the site Wi-Fi. cluster: boot the leader first.
With those in mind, follow Pioreactor’s software set-up guide up to Write, and come back here while the card writes.
-
-
Download and unzip the MEP card bundle.
-
When the write finishes, drag the
pioreactorfolder from the bundle onto thebootfsdrive. If you left the Wi-Fi page blank (for the leader Pioreactor to make its own network), also drag across thelocal_access_pointfile, after changingGBin it to your country code*. DO NOT drag it across for workers, or if you set your Pioreactors up to join a Wi-Fi network. If the card was ejected anyway, remove and reinsert it. -
Eject the card. One change to the rest of Pioreactor’s guide: for a unit that makes its own Wi-Fi, join the network
pioreactor(passwordraspberry) and openhttp://pioreactor.local. Then continue the guide from its step 18. At the model dialog, choose the Pioreactor 20 ml v1.1.* If your country code is not GB, open
local_access_pointin TextEdit/Notepad and replaceGBwith the ISO two-letter code (CA, IE, DE, AU, NZ, GL, US, etc.; see https://en.wikipedia.org/wiki/ISO_3166-1_alpha-2) and save; the file should contain just those two letters. Do nothing if you live in the United Kingdom of Great Britain and Northern Ireland (GB). -
Open the unit’s web interface and hard-refresh (Ctrl/Cmd+Shift+R).
-
Check electroPioreactor is listed under Pioreactors → your unit → Manage → Activities. If it is missing, put the card back in your computer and read the log in
pioreactor/plugins/failed/on the The small boot partition of the flashed microSD card, and the only part a Mac or PC can open. The card bundle's files go here. drive. Then install over Secure Shell: a command line on the Pioreactor from your computer's terminal, for example ssh [email protected]., as in AEP-Plugin/README.md. -
If the unit has no internet, set its clock from the computer, replacing
<hostname>with the unit’s The unit's network name, chosen when flashing the card. Its web interface is then at http://hostname.local.:ssh pioreactor@<hostname>.local "sudo date -u -s '$(date -u +'%Y-%m-%d %H:%M:%S')'"
What the plugin does
One background job:
- drives Splitting water with an electric current: hydrogen at the cathode, oxygen at the anode. It supplies the hydrogen the HOB grow on. on One of the HAT's four LED outputs, A to D. The electroPioreactor job drives the electrodes from channel D, clamped to 10% power., clamped to 10% power to protect the electrodes;
- Bubbling gas through the culture. Here, CO₂ from the cylinder flows down the anode on a timer set in the electroPioreactor job. CO₂ on the One of the HAT's five switched power outputs. In this build: 1 stirring, 2 media pump, 3 waste (product) pump, 4 CO₂ solenoid (relay), 5 heating. 4 relay;
- pauses electrolysis during each sparge;
- pauses Optical density: how cloudy the culture is, read from scattered light. It tracks cell growth. reading for the sparge plus a settle window.
Without the card bundle (older Pioreactor OS)
Pioreactor OS needs boot-partition plugin support for the card route. On an older release: flash and boot as Pioreactor’s guide says, run pio update, and install the plugin over SSH as in AEP-Plugin/README.md. A unit already running can also install it from Plugins in the web interface’s left-hand menu.
Notes
- Name each unit by location plus unit number, for example
ed04. - If the page at
<hostname>.localwill not load while the unit runs its own access point, open http://10.42.0.1 instead.
Parts
- 1×microSD cardpart
Tools
- 1×Computer with microSD card readertool
Check your work
In Inventory, which model does this unit show?
Set it to the 20 ml v1.1 in Inventory. Until then, Optical density: how cloudy the culture is, read from scattered light. It tracks cell growth. readings are interpreted against the wrong hardware.
Set it to the 20 ml v1.1 in Inventory. Until then, OD readings are interpreted against the wrong hardware.
Show the answer
Answer: Pioreactor 20 ml, v1.1
- If you see Pioreactor 40 ml, v1.5: Set it to the 20 ml v1.1 in Inventory. Until then, Optical density: how cloudy the culture is, read from scattered light. It tracks cell growth. readings are interpreted against the wrong hardware.
- If you see Pioreactor 40 ml, XR variant: Set it to the 20 ml v1.1 in Inventory. Until then, OD readings are interpreted against the wrong hardware.
What does Pioreactors → your unit → Manage → Activities show?
Hard-refresh the page (Ctrl/Cmd+Shift+R). Otherwise put the card back in your computer;
pioreactor/plugins/failed/onbootfsholds the A Python package file (.whl). The card bundle carries the plugins as wheels; one that fails to install lands in pioreactor/plugins/failed/ on bootfs, with a log. and a log of what went wrong.That is the stock Pioreactor default. Set One of the HAT's five switched power outputs. In this build: 1 stirring, 2 media pump, 3 waste (product) pump, 4 CO₂ solenoid (relay), 5 heating. 4 to
relayon the UI's Configuration page, then install again over Secure Shell: a command line on the Pioreactor from your computer's terminal, for example ssh [email protected]..Show the answer
Answer: A list that includes electroPioreactor
- If you see A list without electroPioreactor: Hard-refresh the page (Ctrl/Cmd+Shift+R). Otherwise put the card back in your computer;
pioreactor/plugins/failed/onbootfsholds the A Python package file (.whl). The card bundle carries the plugins as wheels; one that fails to install lands in pioreactor/plugins/failed/ on bootfs, with a log. and a log of what went wrong. - If you see A list without it; the log refuses
[PWM] 4 = 'waste': That is the stock Pioreactor default. Set One of the HAT's five switched power outputs. In this build: 1 stirring, 2 media pump, 3 waste (product) pump, 4 CO₂ solenoid (relay), 5 heating. 4 torelayon the UI's Configuration page, then install again over Secure Shell: a command line on the Pioreactor from your computer's terminal, for example ssh [email protected]..
- If you see A list without electroPioreactor: Hard-refresh the page (Ctrl/Cmd+Shift+R). Otherwise put the card back in your computer;
Compared with your computer's clock, what date and time does the unit show?
An offline unit has no time source. Set its clock from the computer with the
sudo datecommand on this page.Show the answer
Answer: The same date and time, to the minute
- If you see A different date, or a time minutes out: An offline unit has no time source. Set its clock from the computer with the
sudo datecommand on this page.
- If you see A different date, or a time minutes out: An offline unit has no time source. Set its clock from the computer with the
Step checked